
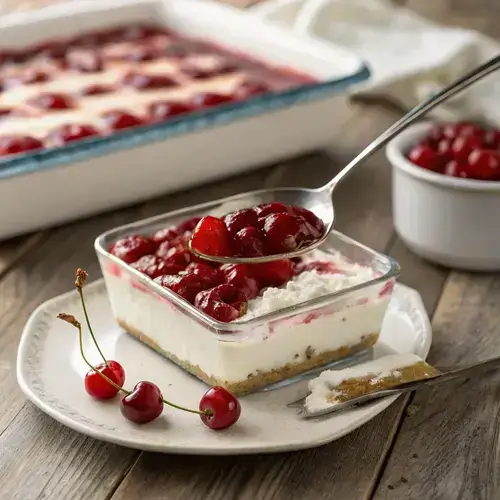
Hey friend, if you’re craving a dessert that feels like edible clouds and sweet ruby gems, look no further. Fluffy angel food cake cubes nestle beneath a dreamy cream cheese frosting—kissed with a hint of vanilla and made silky with a splash of milk—topped by creamy whipped topping and generous spoonfuls of ruby-red cherry pie filling. Each bite is a dance of spongy sweetness, tangy cherries, and velvety layers that melt in your mouth. Perfect for backyard gatherings or cozy nights in, this Cherries in the Snow treat will have everyone begging for seconds, making every moment downright unforgettable.
Table of Contents
Why You’ll Love This Cherries in the Snow
- Trust me, you’re going to love the creamy, dreamy texture!
- This one’s a game-changer for any dessert table.
- It’s super easy to whip up, perfect for last-minute gatherings.
- Cherry pie filling adds a burst of fruity flavor that’s irresistible!
- It’s a crowd-pleaser that will have everyone asking for seconds!
Recipe Snapshot
| Feature | Details |
|---|---|
| Category | Dessert |
| Cuisine | American |
| Prep Time | 20 minutes |
| Cook Time | no cooking |
| Extra Time | 120 minutes (Refrigerating) |
| Total Time | 140 minutes |
| Dietary | No-Bake |
| Serves | 8 |
| Best Served | Chilled and layered |
Ingredients
Here’s everything you need to create the delightful Cherries in the Snow dessert!
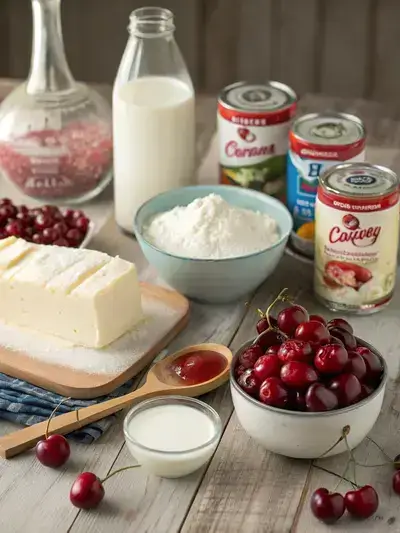
- 12 oz cream cheese – softened for easy mixing
- ¾ cup powdered sugar – for just the right amount of sweetness
- ⅓ cup whole milk – helps achieve a creamy consistency
- ½ tsp vanilla extract – adds a lovely flavor
- 8 oz whipped topping – for a light, fluffy texture
- 1 angel food cake – the perfect base for the layers
- 2 (21 oz) cherry pie fillings – for that fruity burst of flavor
How to Make Cherries in the Snow
Get ready for a delightful dessert experience! This recipe is simple and fun, perfect for any occasion.

Step 1: Beat the Cream Cheese
In a large bowl, beat 12 oz of cream cheese and ¾ cup of powdered sugar until smooth and creamy.
Step 2: Add Milk and Vanilla
Pour in ⅓ cup of whole milk and ½ tsp of vanilla extract. Mix until everything is fully combined.
Step 3: Fold in Whipped Topping
Gently fold in 8 oz of whipped topping until the mixture is light and fluffy. This is where the magic happens!
Step 4: Prepare the Cake
Cut 1 angel food cake into cubes. Layer half of the cake cubes in a glass baking dish.
Step 5: Spread the Cream Cheese Mixture
Spread the cream cheese mixture over the first layer of cake cubes. Make it nice and even!
Step 6: Add More Cake and Cherries
Add the remaining cake cubes on top. Then, pour 2 cans of 21 oz cherry pie filling over everything.
Step 7: Chill Before Serving
Refrigerate for at least 2 hours before serving. This allows all the flavors to meld beautifully!
Pro Tips for Making Cherries in the Snow
- Soften cream cheese for easier mixing.
- Chill the whipped topping for a fluffier texture.
- Layer the ingredients gently to maintain a beautiful look.
- Use fresh cherries for a pop of flavor and color.
- Let it sit in the fridge for a few hours for the best taste.
How to Serve this Cherries in the Snow
- Serve chilled for a refreshing treat.
- Top with extra whipped topping for added fluffiness.
- Garnish with fresh mint leaves for a pop of color.
- Pair with a scoop of vanilla or almond ice cream.
- Enjoy with a side of graham crackers for a crunchy contrast.
- Drizzle with chocolate syrup for a decadent twist.
- Serve in individual cups for a fun party presentation.
- Use as a filling for crepes or pancakes for a breakfast delight.
Make Ahead and Storage
You can make this delightful dessert ahead of time and store it properly:
Storing Cherries in the Snow Leftovers
- Cover leftovers tightly with plastic wrap or transfer to an airtight container.
- Store in the refrigerator for up to 3 days.
- Keep the cherry topping separate if possible to maintain texture.
Freezing Cherries in the Snow
- Portion the dessert into individual servings for easy thawing.
- Wrap each portion in plastic wrap and then in aluminum foil.
- Label with the date and freeze for up to 2 months.
Reheating Cherries in the Snow
- Thaw in the refrigerator overnight before reheating.
- For best results, reheat in the microwave in short intervals, stirring gently.
- Avoid overheating to maintain the creamy texture.
Cherries in the Snow
Ingredients
Equipment
Method
- In a large bowl, beat 12 oz of cream cheese and ¾ cup of powdered sugar until smooth and creamy.
- Pour in ⅓ cup of whole milk and ½ tsp of vanilla extract. Mix until everything is fully combined.
- Gently fold in 8 oz of whipped topping until the mixture is light and fluffy. This is where the magic happens!
- Cut 1 angel food cake into cubes. Layer half of the cake cubes in a glass baking dish.
- Spread the cream cheese mixture over the first layer of cake cubes. Make it nice and even!
- Add the remaining cake cubes on top. Then, pour 2 cans of 21 oz cherry pie filling over everything.
- Refrigerate for at least 2 hours before serving. This allows all the flavors to meld beautifully!
Notes
| Nutrient | Amount per Serving |
|---|---|
| Calories | 250 |
| Fat | 10g |
| Protein | 3g |
| Carbs | 38g |
You can visit our breakfast, lunch, dinner and desserts recipes from here:
Breakfast, Lunch, Dinner, Desserts
FAQs
Here’s a helpful FAQ about this recipe:
1. Can I use low-fat cream cheese for Cherries in the Snow?
Yes, you can use low-fat cream cheese as a substitute for regular cream cheese. It will still provide a creamy texture, but the flavor might be slightly less rich. Just make sure to blend it well with the powdered sugar to achieve a smooth consistency!
2. How can I make this dessert ahead of time?
Cherries in the Snow can be made a day in advance! Simply prepare the layers and assemble the dessert, then cover it and refrigerate. This allows the flavors to meld beautifully. Just add the cherry pie filling right before serving for the best presentation!
3. Can I substitute the angel food cake with another type of cake?
Absolutely! If you prefer, you can use a sponge cake or a pound cake as a substitute for the angel food cake. Just keep in mind that the texture and sweetness may vary slightly, but it will still be delicious!
4. What can I use instead of whipped topping?
If you want to avoid whipped topping, you can make your own by whipping heavy cream with a bit of powdered sugar and vanilla extract until soft peaks form. This will give you a fresh and creamy alternative that works perfectly in this recipe!
Final Thoughts
Cherries in the Snow is not just a dessert; it’s a delightful experience that brings back sweet memories! With its creamy layers and fruity topping, this simple recipe is sure to impress your family and friends. So, gather your ingredients, whip it up, and enjoy every delicious bite. Trust me, you’ll be coming back for seconds!