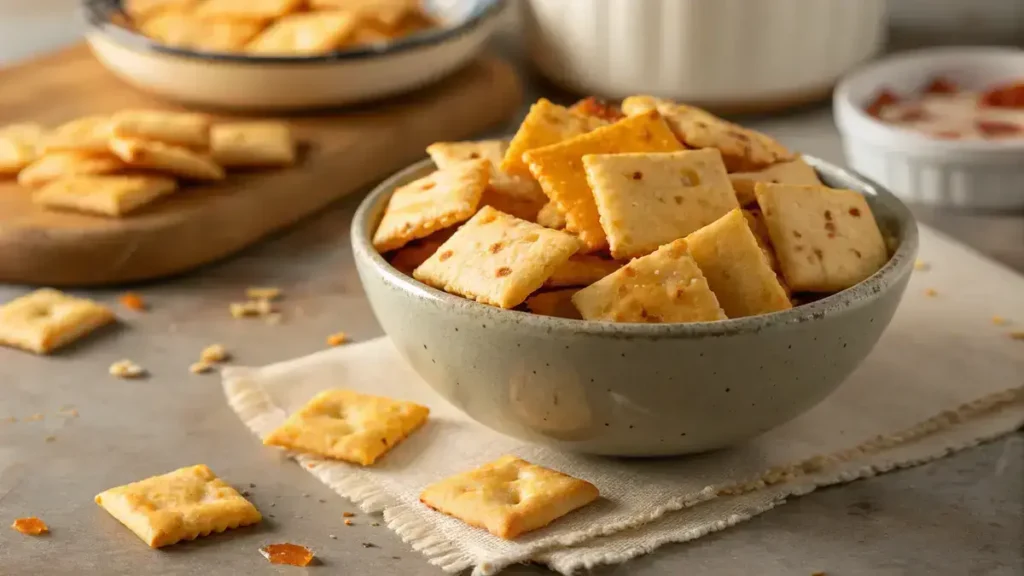
Homemade Cheez-Its are your ticket to a sunlit afternoon snack break, where each crispy, golden square bursts with bold cheddar flavor and a whisper of garlic that dances on your tongue. Imagine pulsing sharp cheese and butter until they form a crumbly canvas, then adding flour and a hint of ice-cold water to sculpt a perfect dough, chilled to crisp perfection. As they bake, your kitchen fills with that irresistible toasty aroma, promising crunchy delight in every bite. Perfect for sharing, snacking solo, or elevating soup and sandwiches, these irresistible crisps will vanish before your eyes—so stash some away!
Table of Contents
Why You’ll Love This Homemade Cheez-Its
- Made with real sharp cheddar for an authentic flavor.
- Customizable with your favorite seasonings for a personal touch.
- Simple ingredients you likely already have at home.
- Perfectly crispy and satisfying for any snack craving.
- Fun to make and share with family and friends!
Recipe Snapshot
| Feature | Details |
|---|---|
| Category | Snack |
| Cuisine | American |
| Prep Time | 15 minutes |
| Cook Time | 16 minutes |
| Extra Time | 60 minutes (resting) |
| Total Time | 91 minutes |
| Dietary | Vegetarian |
| Serves | 100 crackers |
| Best Served | Cool and crispy |
Ingredients
Gather these simple ingredients to make your homemade Cheez-Its!
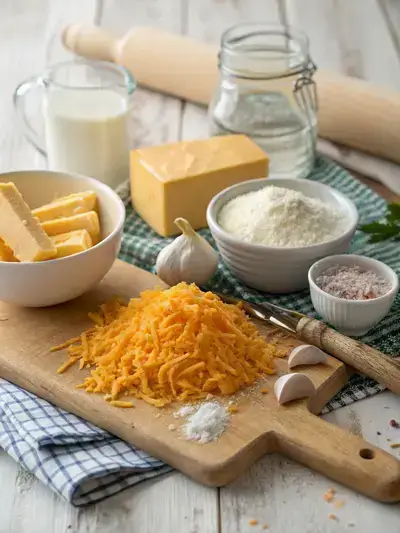
- 8 ounces shredded sharp cheddar cheese – for a rich, cheesy flavor
- 4 tablespoons salted butter – adds a creamy texture
- ½ teaspoon seasoning salt – enhances overall taste
- ½ teaspoon garlic powder – for a hint of garlic goodness
- 1 cup all-purpose flour – essential for the cracker base
- 2–3 tablespoons ice water – binds the dough together
How to Make Homemade Cheez-Its
Get ready to whip up a batch of delicious Homemade Cheez-Its! With a preparation time of about 15 minutes, a cooking time of 12-16 minutes, and a chilling time of at least one hour, these crispy snacks are worth the wait!
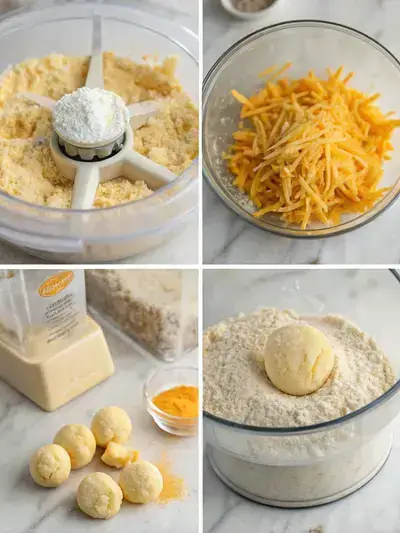
1. Step
In a food processor or blender, pulse the shredded cheddar cheese, softened butter, seasoning salt, and garlic powder until crumbly.
2. Step
Add the flour and pulse until the dough resembles coarse sand.
3. Step
Drizzle in ice water, one tablespoon at a time, pulsing until the dough forms a ball; add an extra tablespoon if needed.
4. Step
Transfer dough to plastic wrap, shape into a disc, wrap tightly, and refrigerate for at least one hour.
5. Step
Preheat oven to 350°F and line a baking sheet with parchment paper.
6. Step
Cut dough in half and roll each half on a lightly floured surface to 1/8–1/4 inch thickness.
7. Step
Cut into 1-inch squares with a sharp knife or pastry cutter.
8. Step
Poke a hole in the center of each square with a skewer or toothpick.
9. Step
Arrange squares on baking sheet, spacing them slightly apart.
10. Step
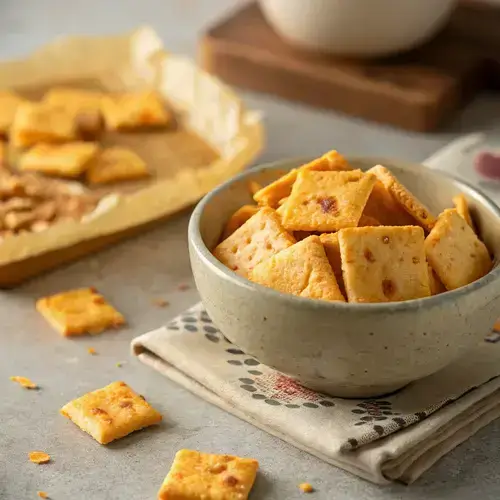
Bake 12–16 minutes until crisp and lightly golden at the edges.
11. Step
Cool completely on the baking sheet before serving or storing in an airtight container.
Pro Tips for Making Homemade Cheez-Its
- Use freshly shredded cheese for the best flavor and texture.
- Chill the dough thoroughly to ensure crispiness.
- Experiment with different seasonings like paprika or cayenne for a kick.
- Keep an eye on the baking time; they can go from golden to burnt quickly.
- Store in an airtight container to maintain crunchiness.
How to Serve this Homemade Cheez-Its
- Enjoy them straight from the oven for a warm, cheesy treat.
- Pair with your favorite dips like hummus or guacamole.
- Serve alongside a fresh veggie platter for a crunchy contrast.
- Use as a topping for soups or salads for added texture.
- Pack them in lunchboxes for a delightful snack on the go.
- Mix with nuts and dried fruits for a homemade trail mix.
Make Ahead and Storage
You can easily make and store your Homemade Cheez-Its:
Storing Leftovers
- Store in an airtight container.
- Keep at room temperature for up to a week.
- Avoid moisture to maintain crispness.
Freezing
- Place cooled Cheez-Its in a freezer-safe bag.
- Remove as much air as possible before sealing.
- Freeze for up to three months.
Reheating
- Preheat oven to 350°F (175°C).
- Spread Cheez-Its on a baking sheet.
- Bake for 5-7 minutes until warm and crispy.
- Let cool slightly before serving.
Homemade Cheez-Its
Ingredients
Equipment
Method
- In a food processor or blender, pulse the shredded cheddar cheese, softened butter, seasoning salt, and garlic powder until crumbly.
- Add the flour and pulse until the dough resembles coarse sand.
- Drizzle in ice water, one tablespoon at a time, pulsing until the dough forms a ball; add an extra tablespoon if needed.
- Transfer dough to plastic wrap, shape into a disc, wrap tightly, and refrigerate for at least one hour.
- Preheat oven to 350°F and line a baking sheet with parchment paper.
- Cut dough in half and roll each half on a lightly floured surface to 1/8–1/4 inch thickness.
- Cut into 1-inch squares with a sharp knife or pastry cutter.
- Poke a hole in the center of each square with a skewer or toothpick.
- Arrange squares on baking sheet, spacing them slightly apart.
- Bake 12–16 minutes until crisp and lightly golden at the edges.
- Cool completely on the baking sheet before serving or storing in an airtight container.
Notes
| Nutrient | Amount per Serving |
|---|---|
| Calories | 150 |
| Fat | 10g |
| Protein | 5g |
| Carbs | 12g |
You can visit our breakfast, lunch, dinner and desserts recipes from here:
Breakfast, Lunch, Dinner, Desserts
FAQs
Here’s a helpful FAQ about this recipe:
1. Can I use a different type of cheese for this recipe?
Absolutely! While sharp cheddar gives the best flavor, you can experiment with other cheeses like Monterey Jack, Gouda, or even a blend of cheeses for a unique taste. Just keep in mind that the texture and flavor may vary slightly depending on the cheese you choose.
2. How do I store my Homemade Cheez-Its?
To keep your Homemade Cheez-Its fresh and crispy, store them in an airtight container at room temperature. They should stay good for about a week. If you want to keep them longer, consider freezing them in a freezer-safe bag, and they can last for up to three months! Just let them thaw at room temperature before enjoying.
3. Can I make these Cheez-Its gluten-free?
Yes, you can easily make these Homemade Cheez-Its gluten-free by substituting the all-purpose flour with a gluten-free flour blend. Just ensure that the blend you choose is suitable for baking, and you should achieve a similar texture and flavor!
4. What can I serve with Homemade Cheez-Its?
These delicious crackers are perfect on their own, but you can also serve them with dips like hummus, guacamole, or a cheesy dip for an extra treat. They also pair well with soups and salads for a crunchy side!
Final Thoughts
Making your own Homemade Cheez-Its is not just simple; it’s a delightful trip down memory lane! These crispy, cheesy bites are perfect for snacking, sharing, or enjoying solo. So roll up your sleeves, gather your ingredients, and get ready to savor the satisfaction of creating a classic treat that’s sure to bring smiles all around!